Windows File Explorer – Search, Create Folders, Move and Rename Files
 It’s the right time to get acquainted with Windows File Explorer. Nowadays, a mere list of file types will not suffice. Having the ability to organize and keep track of all your different files is a huge asset as your Word documents grow. Learning how to use Windows File Explorer can assist with personal organization, guaranteeing efficiency when you just need to find that one file.
Windows File Explorer
Definition of Terms
Previously, we created three documents using your name for the title. One was a Notepad document, another, a Word document, and finally, a PDF. If you haven’t done these lessons, quickly create a Notepad, Word, and PDF document before beginning with File Explorer. Save all three in the Documents folder on your hard drive. (It doesn’t matter what is in the documents, just that they exist.)
Windows 10 File Explorer: How to Create a Custom Startup Folder https://t.co/S2dnpY2kdC pic.twitter.com/jfFHWa4bhy
— Aoando Saraki (@Aoandosaraki) December 7, 2017
Suppose we want to make some changes to our saved Word document. Where should you find it? This is where File Explorer comes in. It is your file types manager. File Explorer opens a window into your computer’s memory, so you can see what is there, including libraries, folders, and obviously, files.
Step-by-Step Guide
To open File Explorer, look at your Taskbar. Do you see the file folder icon on the right?

Hover your mouse over it to see the label, File Explorer. Click on the icon to access your computer’s files. Some computers require a double-click while some, a single-click suffice.
This File Explorer window should look similar to the typical “Save As” window in Notepad and Word. The top line has the File Explorer name on the left with the minimize, maximize and exit icons on the right.
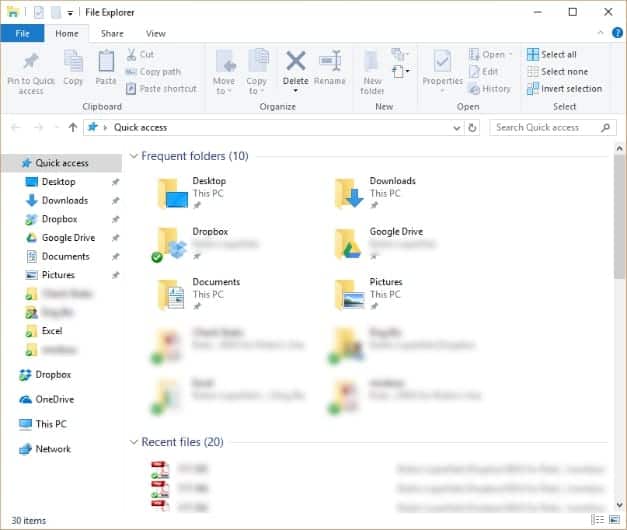
Frequent folders and Recent files are in the central area of the window. You might even see your three documents in the list of Recent Files.
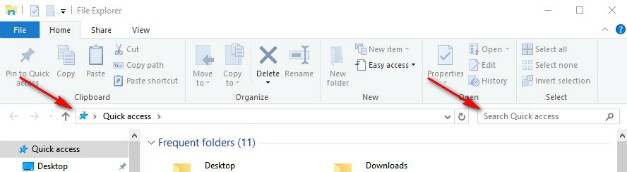
The Navigation Pane is on the left, showing the different storage locations or libraries in your computer. In the Quick Access section, Windows has set up a few categories for you, like Desktop, Documents, Downloads, and Pictures. The more you visit other locations, the higher the probability for Windows to list said locations here, too.
Hover over the words Quick Access, and a downward arrowhead appears.

Click on the arrow to “drill down” or “drill up” in the Quick Access menu. Drilling down makes more choices appear, and drilling up makes fewer options appear. This will work for any headings in the Navigation Pane.
Quick Access tip: Get into File Explorer>Quick Access>Downloads to find anything that you download online. It’s all bound to be there!
Most of our documents are kept in the Documents library, which is a choice in the Quick Access menu. Click on the arrow to make options appear. Click on Documents in the Navigation Pane to select a folder. Instead of your Quick Access items, the contents of your Documents folder appear in the File Explorer window.

We are looking for three documents with your name in the title. You quickly see them now, but let’s pretend you have 300 documents, and you can’t spot them quickly.
File Explorer View Tab
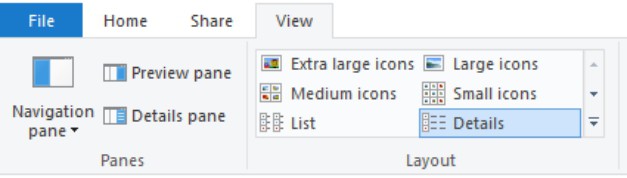
Near the top of the File Explorer window are three tabs: Home, Share, and View. Click on the View tab. In View tab>Layout section, select Details. Now you will have the name of your folders or documents, the date they were last modified or changed, the type of file, and the size. Your columns may differ slightly, but those are the usual four.
Usually, the default setting is to show an alphabetical list of titles. Click the word Name in the name column, and it will reverse the order to Z-to-A. Click it again for A-to-Z. If you want to see the most recently changed documents first, click on the Date modified column. Now click back on “Name” to restore its original setting.
Try the other icons in the View tab>Layout section. The list gives a nice brief list of documents without details. Large Icons give a thumbnail or small picture of the document. That is a very handy setting for photos. Try them all, then revert to Details for today.
One quick note, your computer will remember the last sort you used in Detail mode. If I sort by Date, then switch to View tab>Layout section>List, the document will stay sorted by Date. It pays to always return to alphabetical sorting before leaving Details mode.
Search
In the File Explorer window, there are two boxes or bars under the tabs. One is the Location bar, and the other is the Search bar.
The location bar is the “YOU ARE HERE” circle on the map at the mall; it tells you which part of your computer’s memory you are viewing. The Search bar allows you to search your computer’s memory.
We are still looking for three documents, so in the Search bar, type your name as you named your documents. Use either first or last name if you aren’t sure. All the files within the Documents folder containing your name will appear.
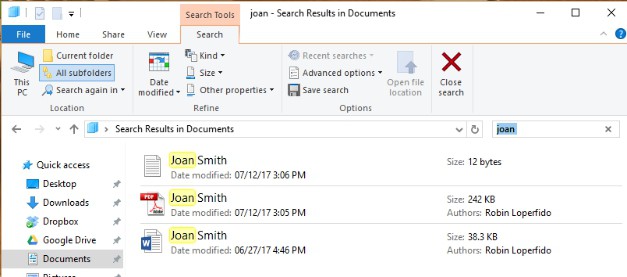
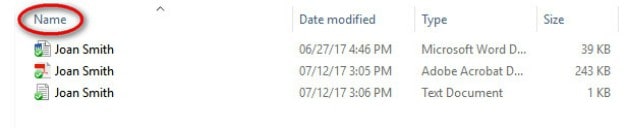
The three documents appeared in the Search window. The little icon to the left of each name tells the type of file. We have a Notepad document, then a PDF, and finally, a Word document.
Right-click our Word document. Spend a few minutes looking at the top and bottom choices of the right-click file menu. Open and Print are near the top. Cut and Copy are near the bottom. Click on Properties, and you’ll find out when you document was created, modified, and what program was used.
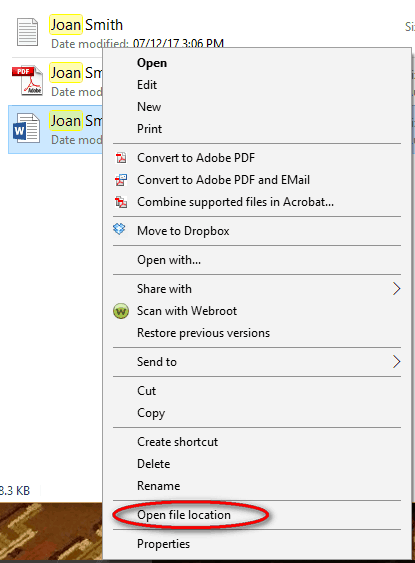
Near the bottom of this right-click menu is Open File Location. Click it, and File Explorer will take you right to the folder containing that document. This is especially handy when you have multiple folders for your Documents.
You can also use the Microsoft Search in the Taskbar, but this looks through your entire computer. It is usually more convenient to start with a folder.
Change Name of a Document
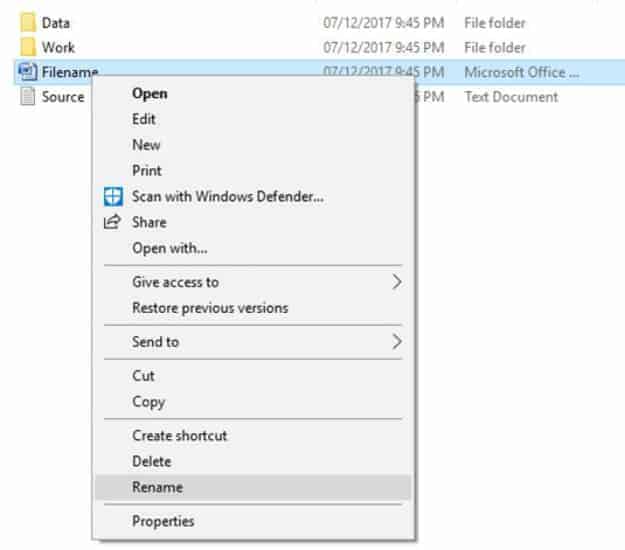
We found our document, but we realized our name is not the best title for this document. How do we change it? Right-click the file and near the bottom, find and click on Rename. Best be careful, as Rename is just above Delete! Rename covers the entire name of your document. Anything you type now will replace its old name. Type today’s date using the year, month, date format separated by dots, such as 2017.06.15 then add a space and your name. Click anywhere, and File Explorer will save the new name. Your document is now named something like 2017.06.15 Jane Doe.
File Folder
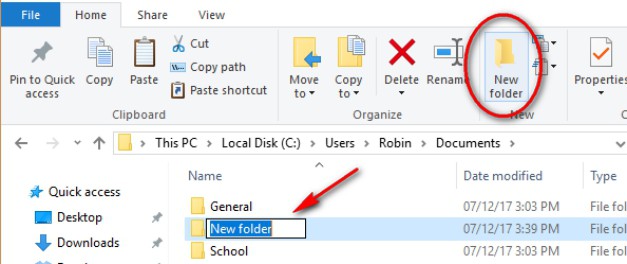
We want to organize all our Noobie lessons within the Documents folder. From the Home tab>New section>select New Folder. A new file folder appears and takes you right to the renaming process. Type Noobie and press Enter to save the new file folder name.
The empty new folder needs our documents. First, click on your Word document, and drag it into the Noobie file folder.
Right-click to Cut your Notepad document, then double-click on the Noobie folder to open it. Do you see your Word document? Right-click anywhere in the blank area of the folder to “Paste” your Notepad document there.
Location Folder
In your Noobie folder, you should now have your Word document and your Notepad document. Let’s get the PDF. Notice the Location bar, just below the Home, Share, and View ribbon.
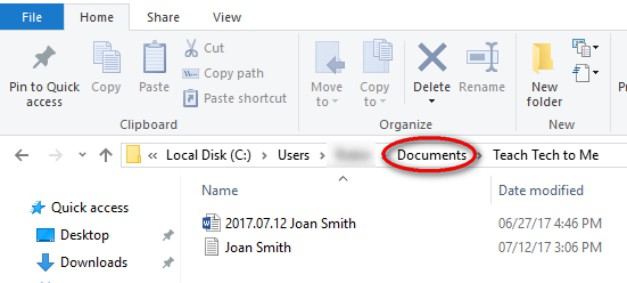
It shows your current location in the computer’s memory. In my example, we are in the c:\ drive>Users>My Name>Documents>Noobie folder. Click the word Documents in the location bar, and it will take you one step back to the Documents folder.
Now find the PDF document with your name, and press on Ctrl+C to copy it. Move it to your Noobie folder by typing Ctrl+V to paste. Move the original from the Documents folder by clicking on Documents in the Location bar, and finding the original PDF. Single-click the PDF name, and press Delete to remove the original. You could also right-click and select Delete from the drop-down menu. Exit from the File Explorer window by clicking the Exit x in the top right.
Pro Tip: If you ever hit Delete by mistake, type in Ctrl+Z to restore it!
Are you excited to learn about the latest features of Windows File Explorer on Windows 10? Sali Caseli tells us all about it in a YouTube video here!
To summarize, between ES File Explorer and the Windows File Explorer, I feel that Microsoft has more to offer its customers. Take the time to learn the ropes of Windows File Explorer and get the most out of its application today! This software seriously brings the A-game to digital documentation management!
Do you have any Windows File Explorer tips you’d like to share with us? Join the discussion below!
Up Next: Microsoft Word Lesson 1: Beginning a Word Document and Formatting