How To Recover Unsaved Word Documents On Your Computer

Lost a file after an unfortunate system crash? Forgot to save hours of work? Here’s how to recover unsaved Word documents.
RELATED: How To Delete A Page In Word
In this article:
- Can I Ever Recover an Unsaved Word File?
- Retrieving Unsaved Word Documents for Mac
- Retrieving Unsaved Word Documents for Windows
- Avoid Losing Files Again By Editing Word’s AutoSave Frequency
- Retrieving Unsaved Word Documents Using Recovery Software
How To Recover Unsaved Word Documents On Windows and Mac
Can I Ever Recover an Unsaved Word File?
We get unlucky sometimes. Hours and hours of work may be lost because of an unfortunate crash or the plain forgetfulness to save.
Don’t worry, it happens. All hope isn’t lost, and there are three ways you can choose from to retrieve your precious work:
- By navigating Microsoft Word and using its data recovery tools.
- Searching for the file in the temporary files folder or using .asd files.
- Using data recovery software.
Retrieving Unsaved Word Documents for Mac
From the Temporary Files Folder

Step 1: Access the macOS Terminal
To do this, open “Applications,” then choose “Utilities.” Double-click “Terminal.”
Step 2: Go To The TMP Folder
Once “Terminal” is accessed, enter open $TMPDIR, which will lead you to the “TMP folder,” which holds temporary files.
Step 3: Look For The Unsaved File
In the “TMP folder,” search for a folder named “TemporaryItems.” Open it, then right-click on the unsaved file you want to recover and choose to open it in Microsoft Word.
Step 4: Save the File
Do this by pressing “File,” then “Save As,” and choose the desired file destination.
From the AutoRecovery Folder

Step 1: Go To The AutoRecovery Folder
Open “Finder,” proceed to “Go,” then “Go to Folder.” Type in ~/Library/Containers/com.microsoft.Word/Data/Library/Preferences/AutoRecovery and press “Go.”
Step 2: Search For Your File
After opening the “AutoRecovery” folder, look for files starting with the phrase “AutoRecovery save of.” Choose the file you want to retrieve, rename it, and add .doc as its file name extension.
Step 3: Open and Save the File
Open the now converted Word file. Save it to your desired destination by clicking “Save As.” Rename it, select a destination folder, and click “save.”
Retrieving Unsaved Word Documents for Windows
The “Recover Unsaved Documents” Feature
Microsoft Word 2010, 2013, and 2016, on top of their autosave capability, have a built-in feature to recover unsaved files. Here’s how to access this:
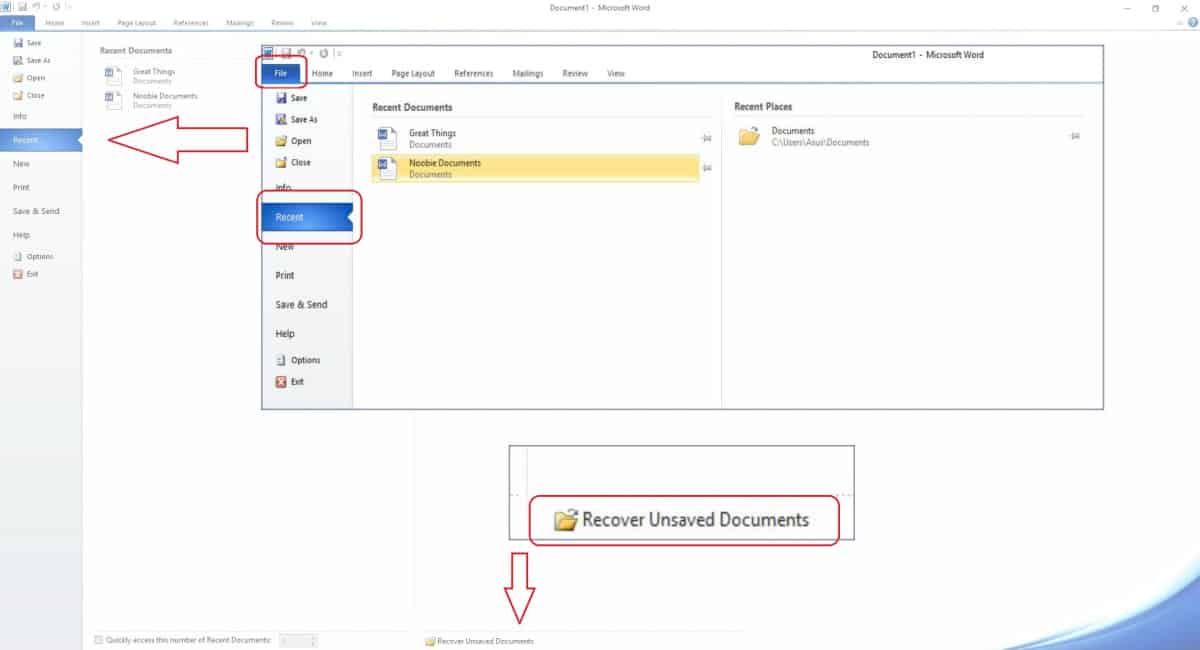
Step 1: Find “Manage Document” and “Recover Unsaved Documents”
In Microsoft Word, click the “File” tab on the upper left. Choose “Manage Document” to open a drop-down list and choose “Recover Unsaved Documents.”
Step 2: Look For Your File
A dialog box will pop up from where recent files will appear. Check for your unsaved document.
Step 3: Open and Save the File
Open the recovered document and select the “Save As” option at the top banner.
Recover Using Its .asd File
If you’re fast enough after Word crashes, you can retrieve a document using its .asd file before other files take their disk space.
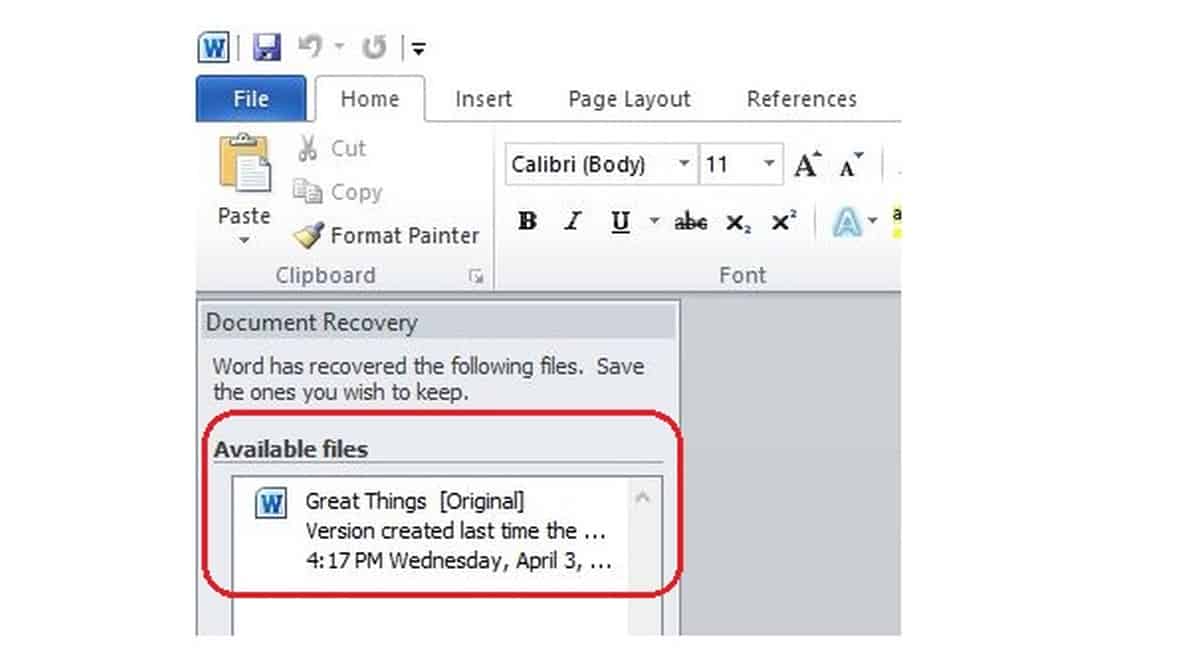
Step 1: Reopen Word
Once your system recovers, reopen Microsoft Word. In most cases, thanks to its autosave feature, the program automatically recovers unsaved documents.
Step 2: Access AutoRecover File Location
If, unfortunately, your document isn’t on the list or the version retrievable isn’t the latest version of your work, click on “File,” “Open,” then “Save.”
On the window that will open, look for the part that says “AutoRecover file location” and copy the file location path and paste it into the “File Explorer.”
Step 3: Search The For Your File
Open the folder with the document’s name and copy the .asd file with the most recent date and time.
Step 4: Paste The .asd File
Return to MS Word. Click “File,” “Open,” then navigate the bottom part of the recent documents list and select “Recover Unsaved Documents.” Paste the copied file into the folder that will pop up and click open to retrieve it.
RELATED: Change Font Size and Format Your Document in Microsoft Word
Avoid Losing Files Again By Editing Word’s AutoSave Frequency
To hopefully never experience unfortunate losses of Word files, you can increase the AutoSave frequency of your MS Word. To do this:
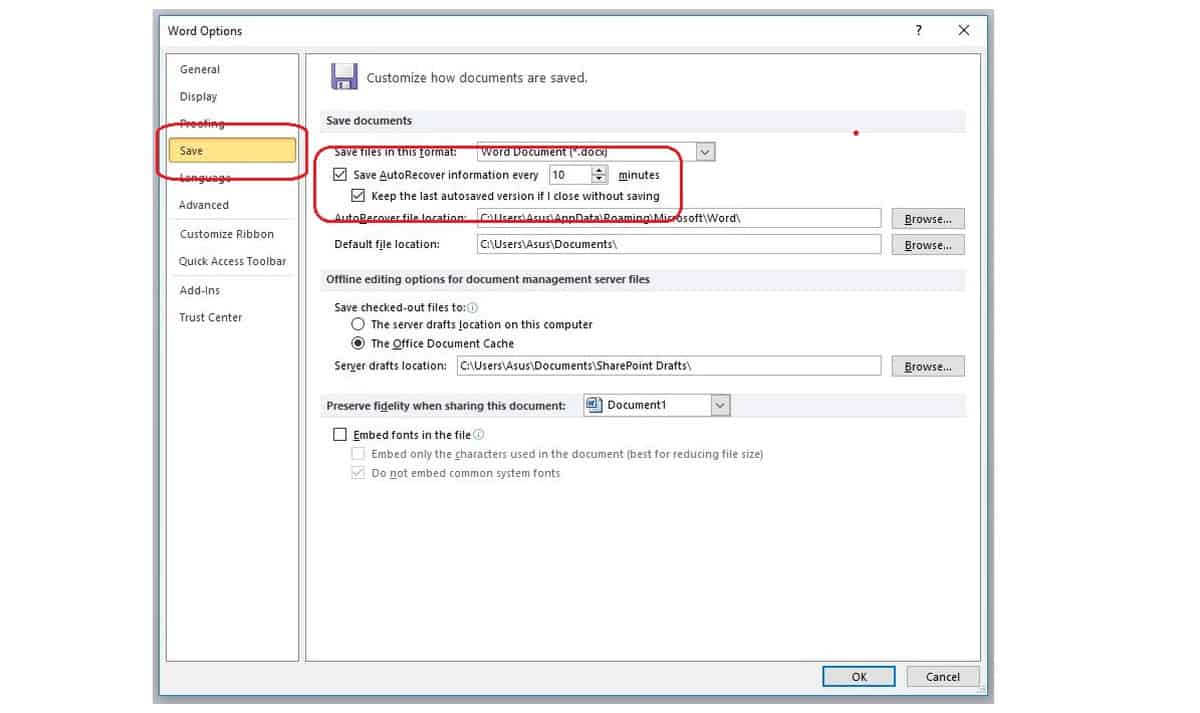
Step 1: Look For AutoSave Frequency Timer Drop-Down List
Open “File” and choose “Options.” Choose “Save” on the left side of the “Options” dialog box.
Step 2: Set the New AutoSave Frequency
Click on the drop-down list beside “AutoRecover Information every” set the frequency as desired and click ok.
Retrieving Unsaved Word Documents Using Recovery Software
Aside from the methods mentioned above, you can also opt to use recovery software to retrieve unsaved or lost files. We’ve listed some of the best free file recovery programs below.
1. MiniTool Power Recovery Data Free
MiniTool Power Data Recovery Free Version 8.0 New Release! It helps Recover Lost Data from All Data Loss Situations. Check it out here:https://t.co/BCqO0CJ6h7 pic.twitter.com/TC9wEY9Zc7
— JenneQ (@Jenne168) May 3, 2018
One impressive thing MiniTool Power Data Recovery Free does during installation is warning users to not install it to the drive you want to recover data from because this may overwrite files.
Its free version comes with a few restrictions, such as the 1GB data recovery limit and the lack of the option to save scan results, but these don’t stop it from being a great data recovery tool. You can also opt for the paid version that unlocks all features and gets rid of the ads.
The program lets you limit the search to certain file types and it can even get files back from partitions that are almost impossible to see.
It scans fast enough and it allows you to search the result to make it easier to locate the file you want to retrieve.
2. EaseUs Data Recovery Wizard Free
Permanently deleted files are actually not necessarily gone forever. EaseUS Data Recovery Wizard allows you to recover shift deleted files or files deleted from recycle bin in Windows 10 with simple clicks.https://t.co/fsiokoRneV pic.twitter.com/dWtm95AObQ
— EaseUS (@easeus_software) March 10, 2019
EaseUs has a very user-friendly interface making the steps to file recovery such a breeze.
Once you open the program, it’s going to ask you which drive you’d like to scour for retrievable data. Magic happens at the press of the “Scan” button.
Despite not giving users the option to configure, things can get easier if you know the destination of the missing file. You can specify it to speed the search up.
3. UnDeleteMyFiles Pro
Don’t let the word “pro” fool you — this program is 100% free. In fact, it doesn’t even have a paid version.
Its interface may not be the best in the world but it offers multiple useful tools, including data recovery. If you’re looking for a free tool to help you get started out with recovering your data, this tool is worth checking out.
4. Disk Drill
Hey! The new release of Disk Drill for #Windows 2.0.268 is online. Grab your free update: https://t.co/R8YdYIwo4A pic.twitter.com/M0jO3NVpLu
— CleverFiles (@Cleverfiles) October 10, 2016
With a simple, intuitive interface, Disk Drill makes data recovery very easy. You can scan local disks, removable drives, and even memory cards with this program.
Scan results of recoverable files are organized by type and it gives you the option of advance previewing image files. Disk Drill is an easy-to-use tool with an impressive success rate.
Available for Windows and macOS, it also has a pro edition that allows you to use it on more computers and provides more advanced scanning options. For unsaved or lost Word files and other minor cases though, the free version should be enough.
Watch how to recover unsaved word Document in this video from GCFLearnFree.org:
We know how frustrating (and infuriating) losing a file can be. Remember to keep your cool and calmly follow the steps above. We hope this guide has helped you recover your unsaved word documents.
Do you have any other tips on solving this problem? Help some friends out in the comments section below!
Up Next:
- Microsoft Word Lesson 1: Beginning a Word Document and Formatting
- Microsoft Word Lesson 2: Word Document to PDF, Inserting a Date, Alignment, and Saving
- 30 Google Docs Resume Templates [Downloadable PDFs]